Gloucester Old Spot pork scaloppine with nettle pappardelle

With most of the vegetables in the garden yet to surface, it seems wholly appropriate to utilise our currently most successful garden edible, nettles, and combine these in a meal with some of our local Old Spot pork.

Nettles (Urtica dioica) really is a great plant species, and not just for eating. Don’t be put off by online diatribes about nettles being ‘unpalatable, disgusting or only survival food’, or statements such as ‘nettle recipes exist for the sake of eating an ingredient because you can’, etc, etc. The secret is in understanding when to pick them (young, early season tips only) and how to prepare them to really get the best from them.

Also, I don’t buy the argument that they are a hassle to prepare.  They are most certainly less hassle to clean and prepare than some other veg we grow and prize e.g. globe artichokes. OK, an extreme example perhaps, but comparable with spinach, for sure.

Yes, nettles can be invasive in a garden, but if you have space for a patch they grow (too?) unabated, demand no attention and offer up a welcome lush green and nutritious crop during the hungry gap (our’s at least – it is longer than most). Later on, they are fabulous refuges and food for insects (and corncrake refuges here too), make superb nitrogen-rich liquid plant food and can help activate your compost heap. For all these reasons, I love my garden nettle patches. Of course, you don’t need to have them in the garden, there’s plenty to forage from urban wasteland, woods and meadows.

iPhone 11 May 2013 046

You might think that living where I do that a crop of pristine unpolluted nettles should be easy to forage.  Well, it is true that we have significant nettle patches in the garden but nightly visits from deer, the dogs cheerfully marking their territory (including the nettles) and most recently, a wily sheep in occupation, make most of our nettles effectively unpalatable.

Even if I wanted to run the ‘urine gauntlet’, I’m reluctant to take an early crop of young nettle tops from our biggest patches. On occasional years, corncrakes arriving from their long migration take a welcome break in this early cover in our garden, especially if the irises have yet to get going, as is the case this year.

The rasping call of the males resonates for a few nights before they move on to more productive machair areas to establish breeding territories. I was optimistic that a corncrake may visit and benefit from our nettles as cover, but our very late i.e. non-existent spring means there was no cover to attract the first arrivals this year.  They must have felt very exposed on arrival.

I shouldn’t exaggerate about our non-existent spring.  It did occur on Sunday past after all, which was glorious and confusing all at the same time.  I was fly fishing on Saturday wearing 3 layers of fleece, couldn’t feel my fingers and abandoned the outing.  On Sunday, we were bewildered by the novelty of stunning sunshine, but not just that – warmth and managed  t-shirts all day and a swim (for the dogs anyway, I’m not quite that hardy). Monday, same old, same old northerly wind, rain and low cloud.  Where art though spring?  Or please can we cut to the chase of summer?

Spring wildlife spectacular

Despite the less than ideal conditions, the wildlife is undeterred and the breeding season is in full swing.  Lapwings and redshanks show their irritation as I pass by their breeding territories on my local run.  I know exactly when and where to expect the next irate protective parent to rise from the vegetation to give me an earful as I pass by.

I watch the oystercatchers nesting round the bay having their frequent and noisy altercations with a pair of local ravens.  Gregarious eiders also nest around the bay, the gentle and soothing call of displaying males resonates on (rare) still nights.  Females will soon form crèches with their broods to help protect the vulnerable ducklings from predation.

The spring migration is ongoing and we currently have reasonable numbers of whimbrels on passage north, stopping at the bay at the bottom of the garden on their way to breeding grounds from Greenland across to Central Siberia. Male cuckoos make their presence heard and wheatears dart around the garden, a flash of white on the rump making them stand out against the grassy backdrop.

We have had spectacular views of a pair of hen harriers and short-eared owls hunting daily across the garden, often flying within a couple of metres of my office window.  This is very distracting while I am working!  Many parts of our garden have remained largely ungrazed for years and the sward is longer than the surrounding common grazing vegetation, so we have a genuine vole hotspot that is proving very fruitful for the local short-eared owls.

I have seen them hunt successfully on a number of occasions, once taking a short-tailed field vole literally from under the kitchen window.  I never tire of watching their graceful billowing flight.  One owl has regularly taken to saving energy by scanning the grass in the garden while perching on a favoured fence post.

owl 004

Another rare and spectacular wildlife watching experience happened this week.  For the first time since we have lived in this house, we had a visit from an otter in the bay at the bottom of the garden.  It is not at all rare to spot otters here and we have had many very close encounters, but our bay is unlikely to form the core part of an otter territory due to the large component of the day when the tide is some distance out of the bay.

However, this young otter appeared to be exploring the area with a view to establishing a territory.  It ran up and down the grassy slopes at the bottom of the garden, methodically exploring overhanging rocks some distance from the shore, before returning periodically to play and feed in the seaweed on the rising tide. It was delightful and a privilege to have such prolonged views of this secretive mammal from our window.

Nettles: weeding and feeding

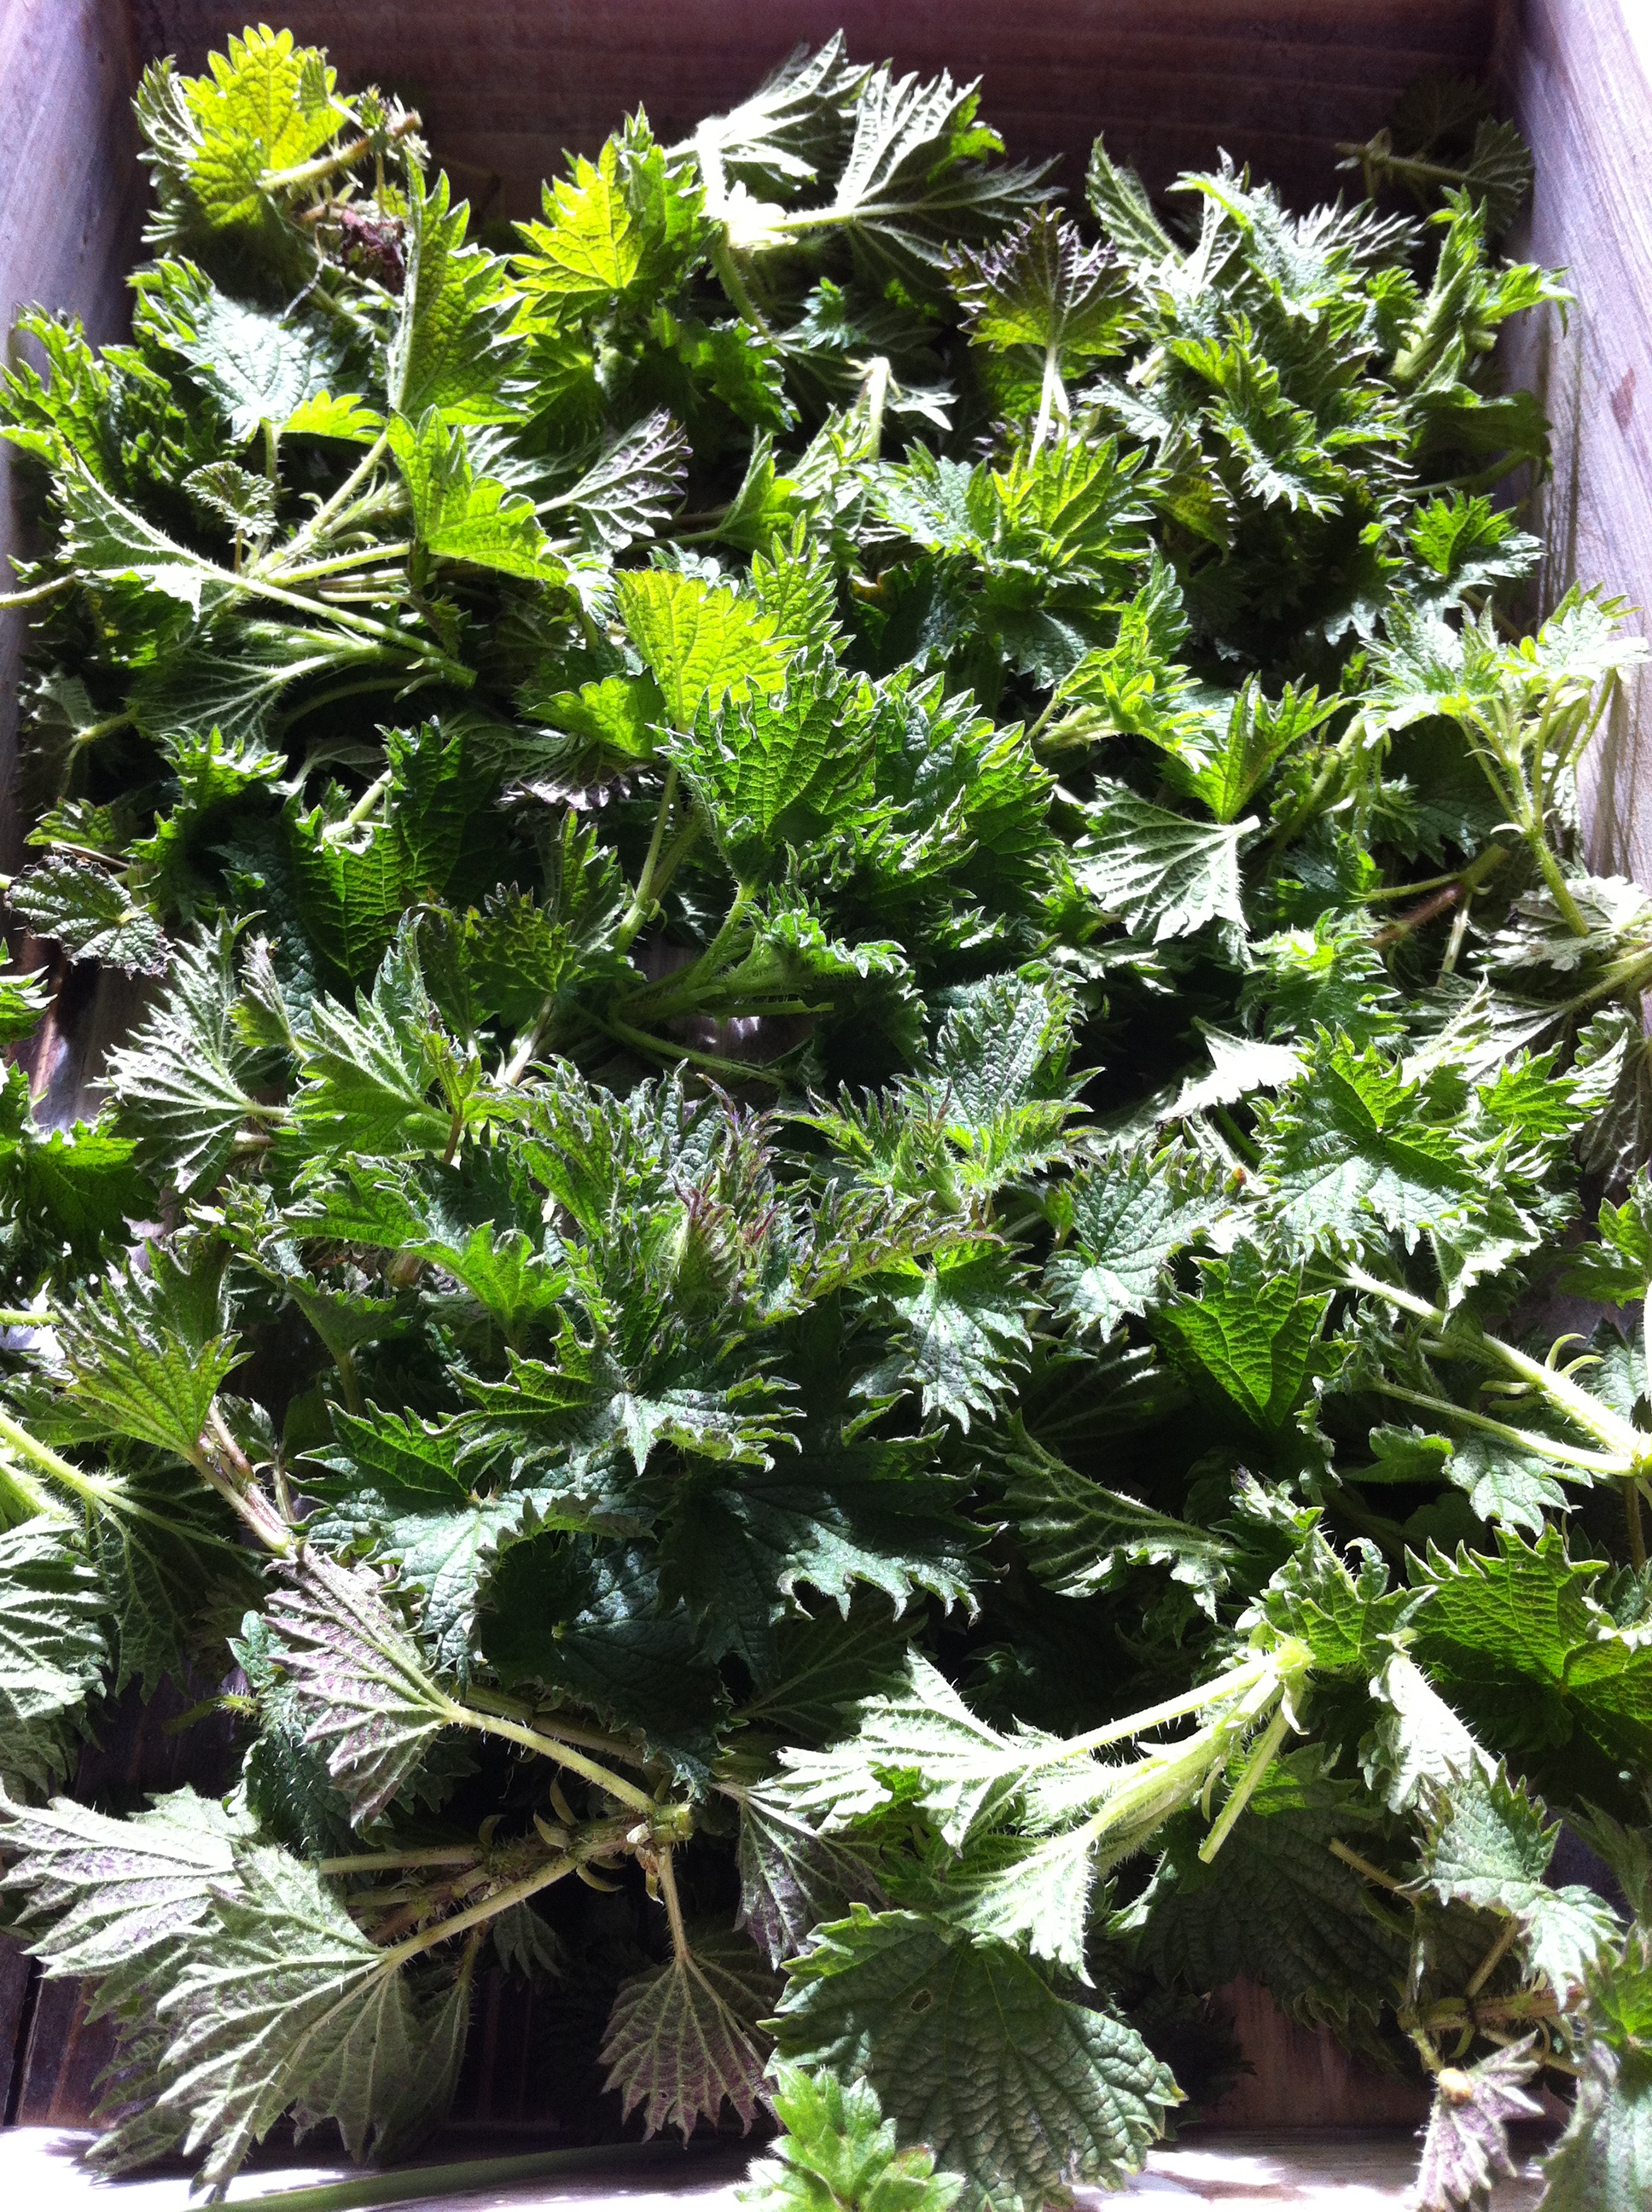
My pristine young nettle tops were picked from my raspberry beds where no marauding beasts have access.  This served to let the new rasp shoots have more space and light to grow. I find this to be the only downside to applying old manure (pig in our case) to permanent beds – weed seeds proliferate.  The nettles are small beer though – I’ve got my hands full with the chickweed later in the season.

I have a pretty extreme reaction to nettle stings, so I harvest using heavy-duty rubber gloves – gardening gloves are not robust enough and I learned my lesson the hard way when I was stung through them.

Although sensitivity to stinging nettles does vary between individuals, my sensitivity has very much increased as I have got older.  I remember, like most children, running through nettle patches and coming out with the familiar white blotches and associated red rash, but it never really hurt as much as just irritated slightly. I would just grab a dock leaf (Rumex spp.), rub it vigorously over the affected area, usually my knees, until my skin turned green from the dock and then continue on my merry way.

Now, even the slightest brush against the youngest stem covered in the small silky irritant hairs, which contain histamine, serotonin and formic acid among other things, is to be avoided. These hairs generate the familiar rash but this is coupled with considerable pain.  Although the rash looks the same, the pain stays and I can feel the effects for up to 2 weeks after being stung and the area of skin remains tingly and sensitive, which is a bit disconcerting. I wonder how common increased sensitivity is with age and expect it isn’t unusual, just unpleasant!

Preparing your nettles

I wanted to incorporate the nettles into pasta.  The best way to deal with them for this is to blanch the young tips, plunge them into boiling water for 3 – 4 minutes, then refresh in ice cold water to retain the vibrant colour.  The stings are now gone and the nettles can be handled.

All stems should be removed and the leaves squeezed lightly before blitzing in a food processor to a fine texture.  The nettles then need to be squeezed hard to remove as much moisture as possible as this will impact on the texture of the pasta.

Nettle pappardelle

I wanted to make a rustic hearty pasta to accompany the pork and thought pappardelle would be a fitting choice for the nettle and to complement the gutsy flavour of the pork scaloppine. I have used the same pasta recipe for about 20 years as it has never let me down.  It is from Nick Nairn’s first book ‘Wild Harvest’. The standard recipe calls for 150g of flour (plain, but I use ’00’).  For this recipe I used 180g to offset the additional moisture the nettle brings to the mix.  I got away with it.  Just.

Ingredients

180g flour, ’00’ or plain

1 whole egg, medium

1 egg yolk, medium

80g of fresh young nettle tips, rinsed, blanched and refreshed, trimmed and blitzed

iPhone 11 May 2013 048

Method

  • Combine the flour, eggs, blitzed and squeezed nettles together in a food processor for 2 – 3 minutes. The mix should resemble fine breadcrumbs, not be gooey.  Add a bit more flour if it is.
  • Tip out the dough and knead briskly for 1 minute.  Wrap in cling film and place in the fridge to rest for an hour.
  • Cut the dough into 2 pieces, flatten each with a rolling pin to 5 mm thick then roll and refold the dough 7 times until you have rectangles about 8 x 18 cm.  This is important to work the gluten to get a shiny dough and gives the correct al dente texture after cooking.
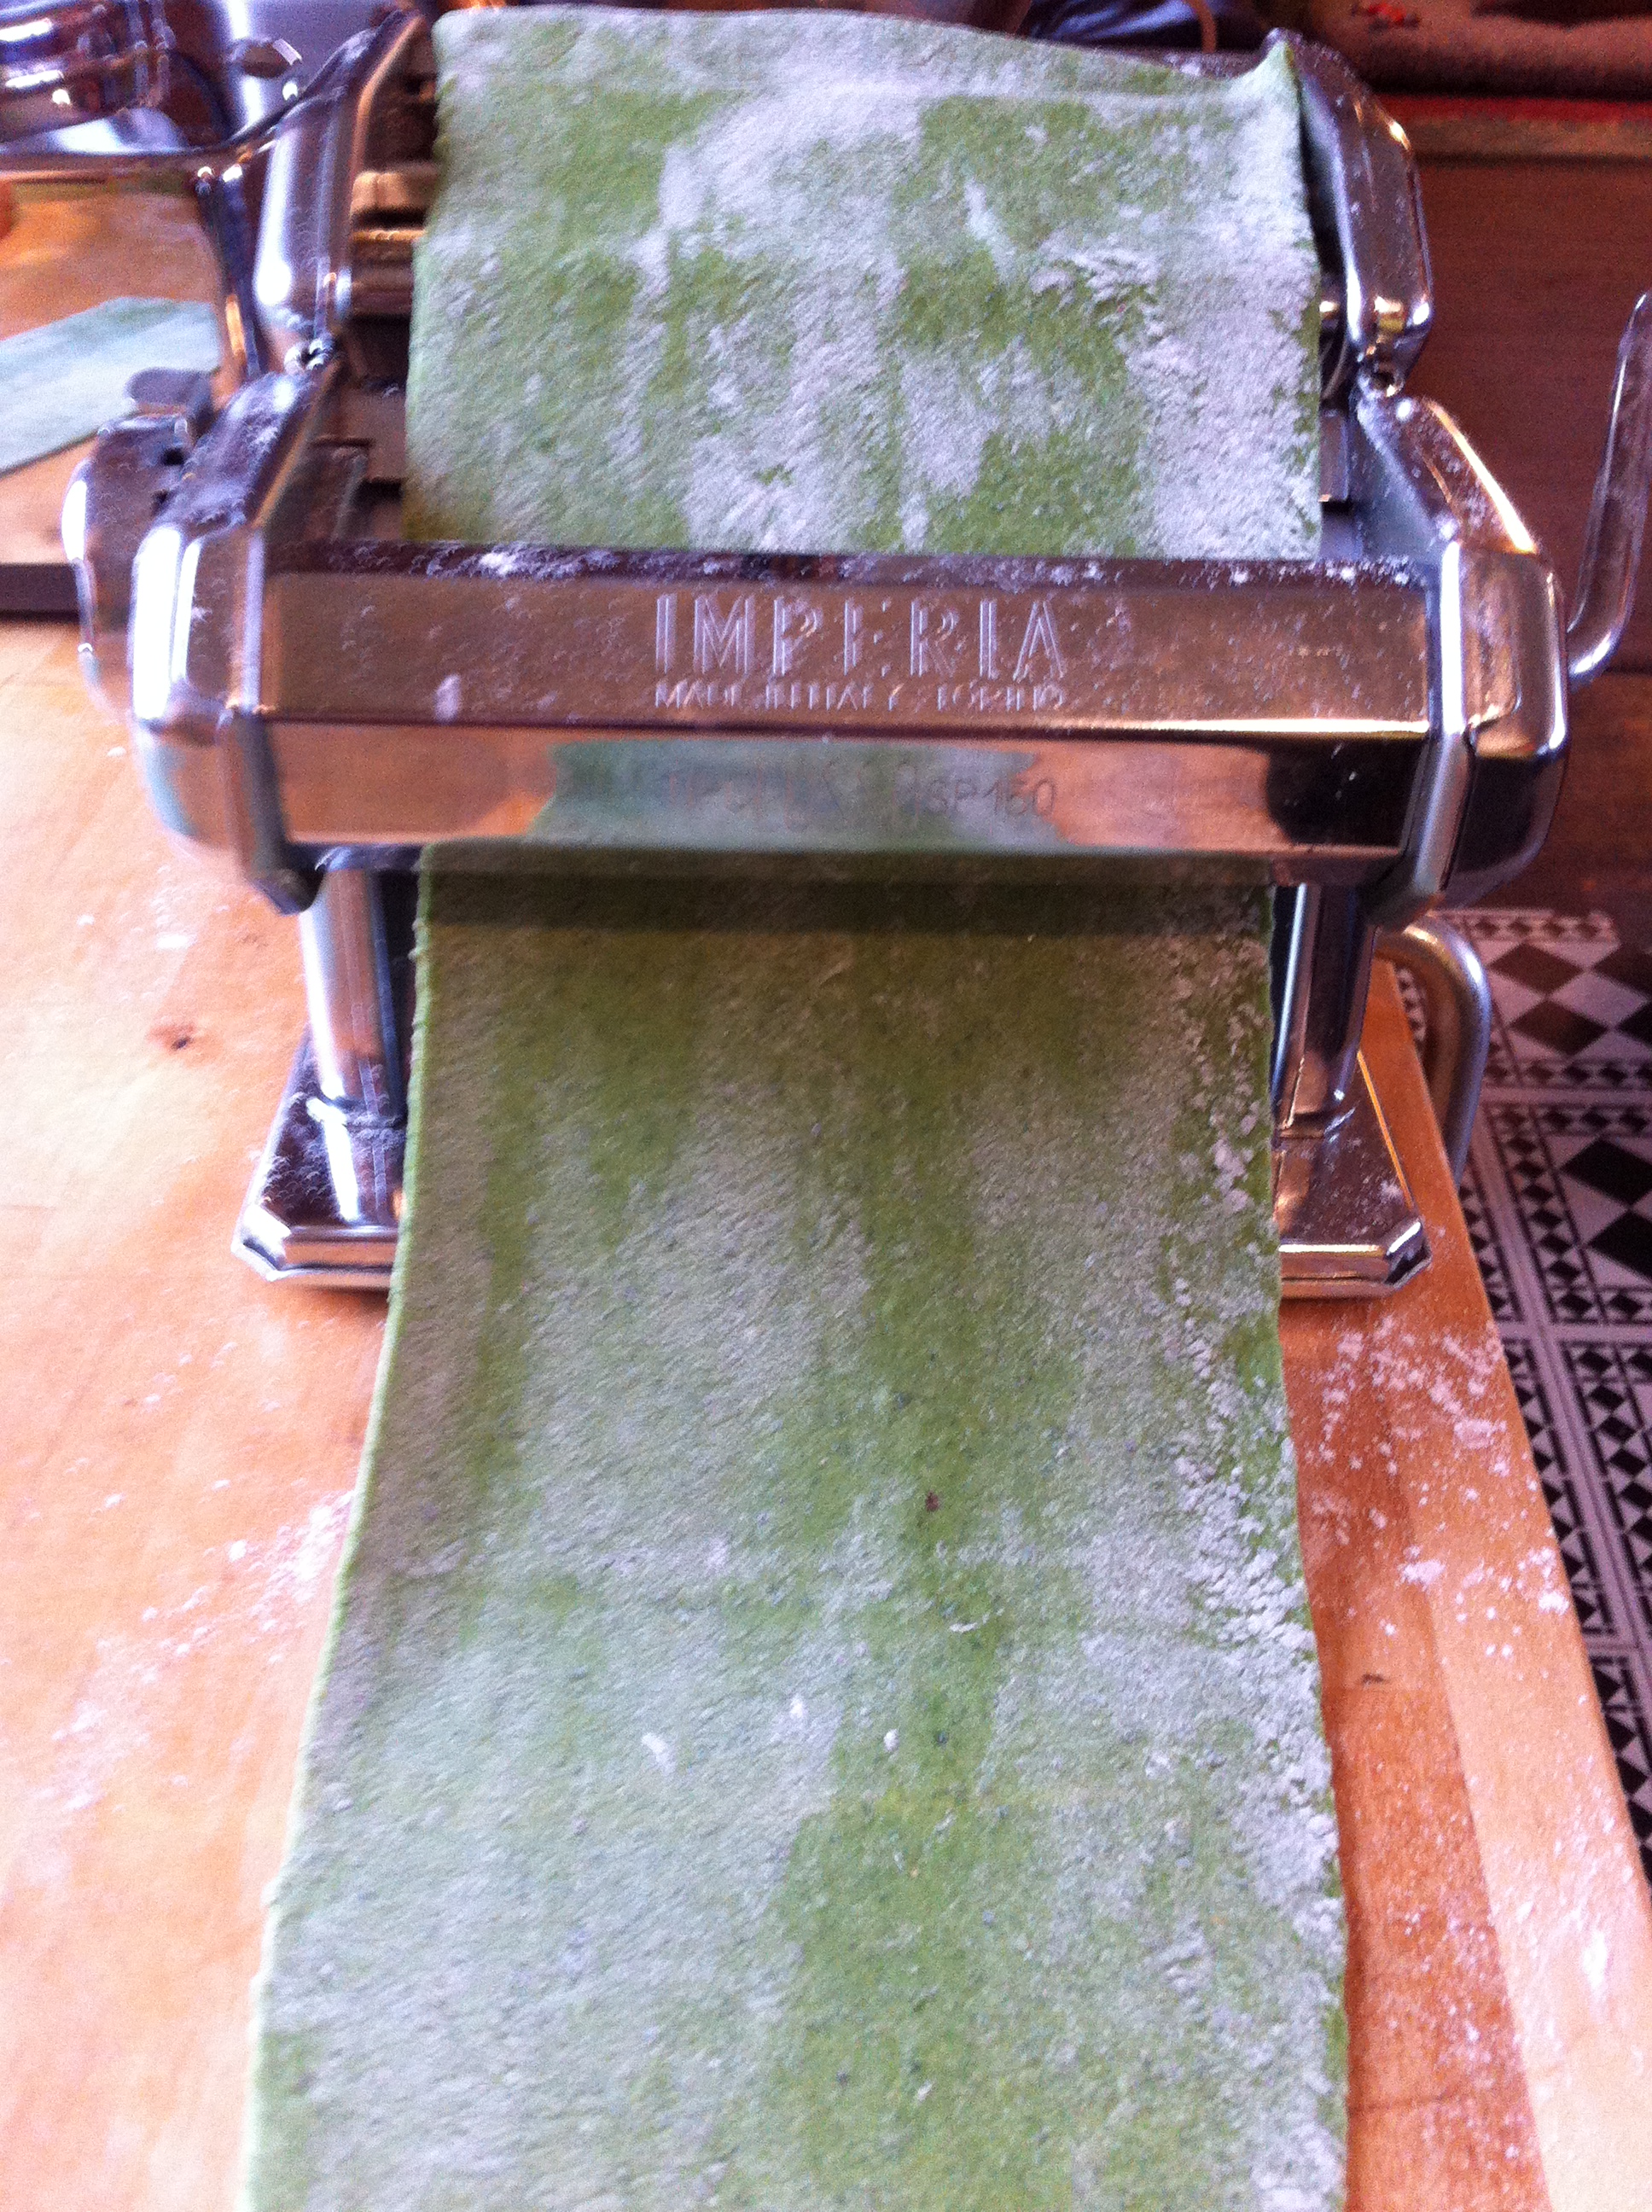
  • Using a pasta machine, set the rollers at the widest setting, pass through the dough and repeat, reducing the roller setting with each pass until the penultimate setting.  Pass through at this setting again and hang up to dry for at least 5 minutes.
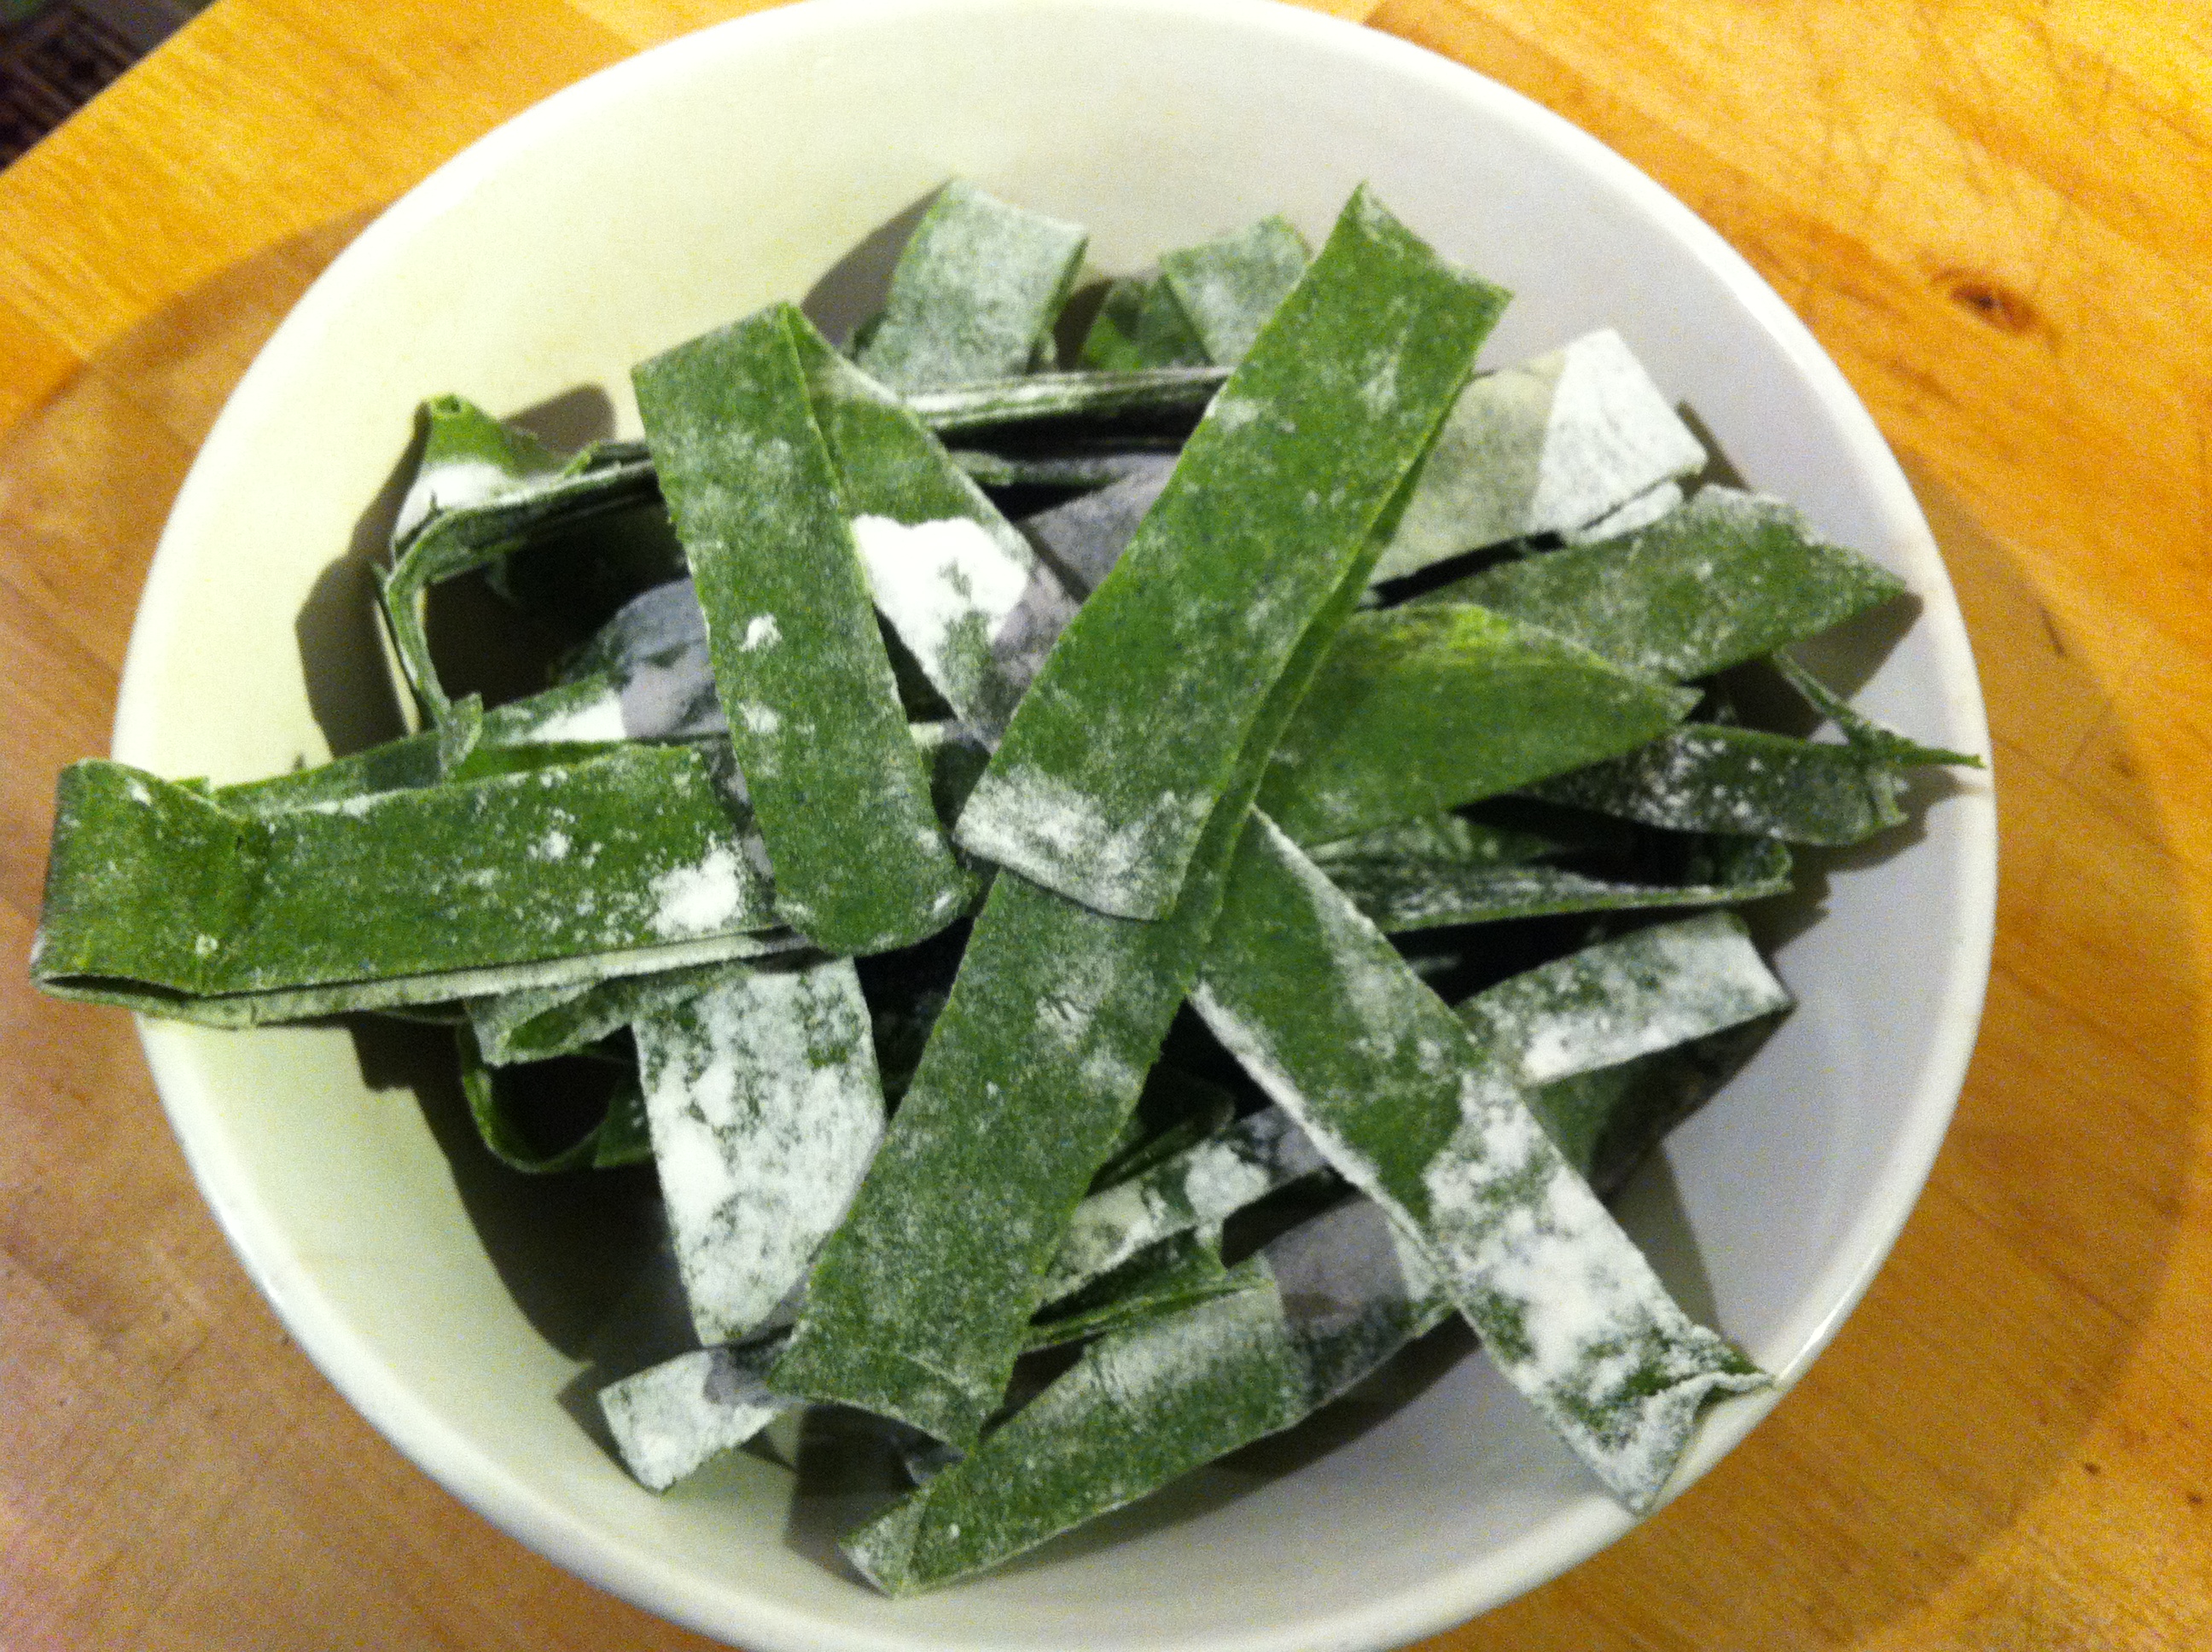
  • Lay the pasta sheet out on a lightly floured surface and roll before slicing about 2 cm wide to produce rustic pappardelle ribbons. Hang them up again until you are ready to use them.
  • To cook, place in salted boiling water, bring back to the boil and cook for 2 – 3 minutes.  Check the texture as you cook.

iPhone 11 May 2013 053iPhone 11 May 2013 049

iPhone 11 May 2013 083

Pork scaloppine with prosciutto, capers and balsamic vinegar – a fitting accompaniment

Ever since I got a hold of our local Old Spot pork, one particular recipe has been pouting at me and I knew it would work very well with this nettle pasta.  I saw this recipe on the The Garum Factory blog pages.  The pork is sumptuously blanketed in prosciutto with pungent sage delicately folded within which also shines enticingly through the prosciutto. The sauce is perfect with the pork – and the nettle pappardelle.

Jody and Ken are not just accomplished chefs, but Ken is also a superb photographer.  His images capture the essence of this recipe and my photos would simply not hold up to their exquisite gallery of images that accompany the recipe. I do not reproduce the recipe, but it can be found here.  Thank you Jody and Ken.  It was really delicious!

My pork scaloppine and nettle pappardelle

My pork scaloppine and nettle pappardelle

Harissa chicken with chickpeas, olives and preserved lemons

After 3 months on a cool larder shelf, the long anticipated wait to try my preserved lemons is over. I incorporated them in this suitably North African supper dish, which delivers a nice balance of piquant flavours with a combination of harissa, spices, olives and preserved lemon. I used chicken thighs as I always consider this brown poultry meat to be superior in flavour and more moist than chicken breasts. It is also more economical, an important consideration when using free range chicken. My updates about gardening, fishing and wildlife follow or you can cut straight to the recipe at the bottom of the post.

The Hebridean weather pendulum

The harissa chicken casserole could be eaten at anytime of year.  It has a sunny, refreshing, summery disposition, yet has the depth of flavour and warmth that are reminiscent of casserole comfort required in cold weather. The schizoid personality of the dish then perhaps matches the spring weather here at the moment: wild swings from calm periods with blue skies to short sharp shocks of wild, squally downpours rolling in on weather fronts from the Atlantic.  Then there have been a few days of persistently strong gales of 30-40 mph.  The relentless nature of these days makes dog walking fairly tedious (when facing the prevailing wind, at least) – and as for seed sowing – tricky.  Even the broad beans are likely to be cast out of my hands in the gusts.  Carrots? Forget about it, the seeds would be cast in the wind and likely end up germinating somewhere on the west side of Skye.

Gardening with grit

With another long term forecast for a week of wind and unsettled weather, I have decided to ignore our typically erratic Hebridean spring weather and am determined to make the best of the light nights to get on with planting and sowing. I did, after several attempts, manage to dive out between showers and plant my potatoes, having spent a week of evenings and two weekends digging the soil over in readiness, including removal of 2 huge rocks that had fell into the centre of the old blackhouse from the walls.

The second rock levered out with deer posts - it took us over an hour to remove it

The second rock levered out with deer posts – it took us over an hour to remove it

Intact collection of bottles and jars from the blackhouse

Intact collection of bottles and jars from the blackhouse

Within the walls of the old blackhouse, where there once stood an inn, then a post office (before the war, we think), we gathered quite an inventory: remains of one sheep, 4 broken teapots, countless spoons, bottles and containers, mounds of broken crockery, ink pots and a candlestick!

Planting potatoes is not the most stimulating job, but made that bit more interesting by trying to do so between the showers, looking up, trying to judge when the next one would hit as the black clouds of doom and rain sheets approached from the west. The best indication is always the preceding acceleration in wind speed, the blast serving as a warning that you are most likely to get pounded by heavy rain at any second. Then it is over in minutes, sunshine and fragments of blue sky allowing a window of opportunity for more planting.

Frustrating as this was, I had no excuses to prevent me from getting on with organising the polytunnel for the coming season.  Despite a couple of rips which we patched, the tunnel has stood up remarkably well in what is its 4th season.  We feared the plastic would be shredded during the first winter, so we are delighted that the plastic has almost made the anticipated 5 year lifespan, even out here. My chilli and tomato seedlings, raised in a heated propagator are robust and strong.  Pea and beans in sown root trainers will be ready for planting next week and a plethora of herbs have germinated, including 5 varieties of basil that I will sow successionally across the summer.

harissa chicken post 006

Strawberries in planters protected in the tunnel

Strawberries in planters protected in the tunnel

Chillis- 6 varieties

Chillies- 6 varieties

Robust tomato seedlings

Robust tomato seedlings

I am as organised as I can be for this time of year – for planting at least.  There is a lot of construction, maintenance and repair work to be done – gates to be repaired and built, fruit cage to be constructed, deer fence ongoing, dry stone walling, ad infinitum….  I don’t want to think about all that too much, best focus on one task at a time or the list becomes overwhelming. To add the ‘to do’ list, we have started thinking seriously about the timeline for extending and renovating the house, a task that will become all-consuming next year.

Adverse angling

The initially cold spring, followed by windy weather has impacted on our fly fishing results too and the brown trout are still fairly deep and inactive. A trip to South Uist for a fly fishing competition last week was a damp squib. The beautiful and productive machair loch, Loch Bornish yielded nothing for the 15 or so anglers present – after 5 hours in the cold and wind.  The highlight was a flock of 90 whooper swans present on the loch in the afternoon.

whooper swans

This week’s outing was arguably even tougher.  40 mph winds whipping the line erratically across the choppy waters of the vast Loch Caravat that nestles within the remote interior of North Uist.  Blanked again.  Still, I did get nice views of black-throated divers.  We walked for miles along the west shore of the loch, the only shore we could fish from with the prevailing wind behind us.  Ironically, at the end of the outing The Man Named Sous caught a fish about 10m from where we started fishing.

loch caravat

BBC Outer Hebrides wildlife spectacular

The week, the mobile cinema of the Highlands and Islands, The Screen Machine was here in Lochmaddy, North Uist.  As part of the programme, they offered a special preview of the a new flagship BBC wildlife documentary series, an episode of which is devoted entirely to the Outer Hebrides. The series is called Hebrides: Islands on the Edge (there’s lots of info in this link) and it is part of the BBC’s up and coming ‘Wild Scotland’ series of programmes. The screening featured episode 3, covering the Outer Hebrides and it was indeed spectacular – and a Screen Machine sell out.

screen machine

hebrides on the edge

The production team of Maramedia have worked on filming this BBC commissioned series for the last 3 years and I have been lucky to be involved with some of their activities, in a very small way.  There have been many contributions from the numerous knowledgeable naturalists across these islands that have helped to support the production team to obtain the spectacular footage.

The director Nigel Pope engaged with local people and naturalists from the start, meeting with the committee of our natural history society, Curracag, which I chaired until recently, calling upon the expertise of our members and very capable naturalists in the wider community.  I also provided some licensing advice for filming of protected birds during the series in my previous job. Nigel and his crew are extremely experienced and knowledgeable about the ecology of the species they film.

He very kindly provided a talk for Curracag members about his work on the series and that of the world renowned wildlife cameramen who shot it.  Nigel and the crew previously worked on other BBC wildlife spectaculars including Big Cat Diaries and Life in the Freezer. At the time of the talk last summer, Nigel had not decided who may narrate the series and was looking for suggestions.  It turns out they did very well in obtaining the services of a high profile Scottish star, actor Ewan McGregor and his narration worked very well on episode 3.

The series is not about hardcore natural history but is excellent eye candy that provides an insight into the character of these islands and their inhabitants. I think the footage in episode 3 captured the essence of the scenery, weather and wildlife of the Outer Hebrides perfectly. Some of the footage, particularly of divers, is incredible.  I have no doubt it will do wonders for wildlife tourism in the Outer Hebrides, which deserves to be put on the map as a special destination to see a unique combination of species in a spectacular setting.  The wildlife and scenery were, after all, key reasons why we ended up living here in the first place. If you have the chance, do watch the 4 part series on the BBC or the web, I’m sure you won’t be disappointed.

Making preserved lemons

And so to the recipes. I have at least 6 different variations on recipes for preserved lemons and have not tried all of them.   I prepared some as a Christmas present for my mum and they worked so well, I could not resist making more when I saw bumper amounts of lemons in a local shop at 20p for 6. The recipe is very simple.  Once prepared, the lemons are best left for at least 2 months.  I left these for 3 months. Here, I have used Ottolenghi’s recipe.

preserved lemons 013

preserved lemons 016

Ingredients

6 unwaxed lemons

6 tbsp sea salt (I use Maldon Salt)

2 sprigs rosemary

1 large red chilli

Juice of 6 lemons

Olive oil

Method

  • Sterilise a jar big enough to hold all of the lemons
  • Wash the lemons and make a deep cut all the way from the top to the base so you are left with 4 quarters attached at the top and bottom of each lemon.
  • Stuff each lemon with a tablespoon of salt, opening up each of the slits and stuffing it in.
  • Push them tightly into the jar and leave in a cool place for a week.
  • After a week, remove the lid, press down the lemons hard to squeeze out their juice and add the juice of 6 lemons, rosemary and whole chilli and cover with a thin layer of olive oil.
  • Seal the jar and leave it in a cool place for a least a month, but the longer the better

You can swap the rosemary and chilli for any appropriate flavour that you like.  I also prepared a batch with coriander and caraway seeds.

Harissa chicken with chickpeas, olives and preserved lemons

This recipe was inspired in part by the availability of my preserved lemons, but also because I have been reading Paula Wolfert’s tome, ‘The Food of Morocco’ to increase my understanding about the delightful cuisine of the country. Her introduction serves to remind the reader that Moroccan ingredients are fairly simple and that some amazing food can be made from a few well selected cheap cuts of meat, combined with herbs and aromatics and pulses and grains to produce honest dishes with incredible depth of flavour.  I try to incorporate those ingredients that typify this ethos here.  I think I am at the beginning of the process of understanding Moroccan food.  I have a long way to go, but will relish the journey.

Chick peas – try to find time to soak and boil dried chick peas in preference to tinned. They are worth the extra effort as they have a much deeper more intense almost meaty flavour.

Harissa – This is easy to make, but on this occasion I used some authentic Moroccan harissa paste purchased for about £1 for a big tub from a shop on Golbourne Road, London.

Ingredients

8 chicken thighs, bone in (free range if possible)

200g dried chickpeas, soaked and cooked (or 1 400g tin, drained)

2 tbsp Harissa paste

2 garlic cloves, crushed

1 fennel bulb, finely sliced

1 large onion, finely sliced

1 tsp cumin seeds, dry fried and ground

1 tsp coriander seeds, dry fried and ground

1/2 tsp ground cinnamon

pinch of cayenne pepper

1 tsp sweet paprika

1 preserved lemon, pulp removed, skin rinsed and finely chopped

150 g mixed black and green pitted olives

200ml chicken stock

olive oil

salt and pepper

Preheat oven to 170C

Method

  • Season the chicken thighs with salt and pepper and sear them in a casserole dish with some olive oil over a medium heat until lightly browned.
  • Remove and allow to drain on some kitchen towel.
  • Add the onion and fennel to the casserole dish, then the garlic, cook until soft and translucent. Add the harissa and spices, stir gently.
  • Return the chicken to the casserole dish, add the chickpeas, olives, chopped preserved lemon and stock.
  • Put in the oven for 45 minutes to allow all the flavours to infuse into the meat and chick peas.  Serve with cous cous and flat bread.

harissa chicken

Ceviche – courtesy of North Uist brown trout

I hadn’t realised how long it had been since I last wrote a post.  As anticipated, the return home a couple of weeks ago means we have had to hit the ground running – too much to do, so little time, plus fabulous, though freezing weather.  This, combined with the clocks changing at the weekend means we have almost switched to our outdoor feral lifestyle that longer days bring. Oh, and the ensuing meatfest – continued delivery of greylag geese, requiring plucking and preparation (I have also tried some curing, we will see if it works…). We also took delivery of half an old spot pig from our neighbour, butchery of which commenced this evening. More on that subject another time, soon.

I therefore must apologise, fellow bloggers, for my reduced interactions – I haven’t had as much time to read and comment on your lovely blogs as I would like recently. Also to those vegetarian readers for the meatfest.  There are some vegetarian posts in my log jam of drafts, please bear with me!

Springtime?

I’m not going to go on about the weather, in fact it is really beautifully clear and crisp here and has been for the last two weeks.  It certainly looks like spring more than it feels like it, the vegetation is slow to grow and the lapwings look a bit perplexed about the lack of cover in their favoured nesting areas behind the house.

The arrival of spring was qualified last week by the birth of the first lambs on the croft behind our house.  I had a walk up and watched them gambolling around the temple a few nights ago.  The trio are two twins and a single who were engrossed in a competition of head-butting and leaping off rocks and bucking wildly before I interrupted. The field will soon be full as new born lambs are let out of the barn with their mothers and the cacophony of displaying waders and shrill bleating will reach a crescendo by Mid-April.

lambs

lambs 2

Fishing at last

The brown trout fly fishing season has now started.  We went out last Saturday in conditions that were the most inhospitable I have ever fished in, so cold I couldn’t feel my fingers and hence the line, winds 35 to 40 mph).  Strong winds don’t usually deter us – or the fish, but the biting cold was insufferable and after an hour, we gave up the pointless exercise and went home.

The weather remained pretty static over this week, and it didn’t require a soothsayer to foresee another fishless outing.  With too much to do in the garden, I opted out and left The Man Named Sous to experience the challenging Loch Hosta unaccompanied.  I have fished this bowl-like machair loch 5 or 6 times and despite it’s reputation for good fishing, I have always blanked.

I know, I should take my role as the current Chair of North Uist Angling Club more seriously.  I’m such a lightweight.  At this stage, I think it would be pertinent to point out that I have not been selected as Chair in a bun fight between those with the best angling prowess across the Isles.  No, I happened to be one of the very few present in the room at the time of the AGM who did not already have a committee role and did not raise sufficient objection not to be awarded the accolade.  In fairness, it at least saves the same 3 or 4 people from having to take on the role for a year. In fact, it is our very efficient secretary who keeps the club running smoothly, the only unique role for the Chair being a short speech at the annual dinner at the end of April.

Progressive gardening

I am glad that I stayed in the garden and had a very productive day.  First I checked my seedlings. Thanks to the very stable environment of my new heated propagator, half of my 8 chilli varieties have germinated.  I planted tomatoes, a plethora of herbs and organised my rotation for the raised beds.

Then, with some trepidation, I decided to start excavating the inside of the old inn, the ruined blackhouse in the corner of our garden where I have resolved to grow potatoes in this year, this covered in a previous potato-based post.

A couple of years ago, we covered over the inside of the ruin with weed suppressing fabric and stored wood and other materials on top of it. After a struggle to drag off the heavily vegetated fabric, I began digging and to my delight found no mat of weed roots and an ideal soil texture almost free of stones. Almost. The next day I did have to get help from The Man Named Sous to remove a rock pile from the centre, as a well as a huge stone that had fallen off the building and into the centre.

It took 2 of us about an hour to dig it out and roll it onto the surrounding walls as it must have weighed at least 100kg. As ever, there is always the expectation that you may find some buried treasure.  Well, I did, but it amounted to nothing more than the remains of a long dead sheep and a couple of neat ink bottles. The dogs thought it was an awesome way to spend a Saturday – digging holes, spraying me with soil and eating roots.  What more could a dog want?

Hector posing in the new potato patch.  Gardening rocks! Literally.

Hector posing in the new potato patch. Gardening rocks! Literally.

Brown trout ceviche

trout

I was delighted that The Man Named Sous did bring home a fish, a 1lb 3 oz brown trout, despite the less than perfect fishing conditions – glare and cold. Ceviche is one of our favourite trout dishes and a really great way to enjoy exceptionally fresh wild fish.

Ceviche is invariably the first dish I make at the start of the new season which also signifies the start of longer and (hopefully) warmer days, a dish I associate with summer, barbecues and eating al fresco (usually while wearing a fleece in North Uist). Sadly, when I visited Ecuador, I was still vegetarian so I have not yet had the opportunity to experience the dish other than that of my own concoction.

I have tried a few ceviche recipes and I tend to ring the changes depending on the amount of each citrus fruit I have at the time, these essentially ‘cook’ the fish.  A reliable recipe for anyone making ceviche for the first time is the River Cottage Sea Fishing Handbook which I have used here.

Filleting fish

Filleting fish does take a bit of practice, the secret is a very good quality and exceptionally sharp and slightly flexible filleting knife.  I use Chroma Type 301 Japanese steel knives which I find very balanced and more comfortable to use than Global, for example. The Chroma filleting knife is very long, flexible, and sharp enough to shave with.  I know this because this is how The Man named Sous, a knife sharpening expert, tests the sharpness of blades (on his arm, I should add, he has a beard!).

These knives are very difficult to sharpen as this must be done on a whetstone, with the correct bevel being applied to each edge of the blade, which varies according to if you are right or left-handed – so I am told. The knife makes filleting very easy.  There is no need to scale the fish for this dish as the skin is not used, although you will need to remove the pin bones.

trout fillet

For ceviche, my preference is for delicately thin slices of the translucent flesh.  Provided the ceviche is eaten relatively quickly, they will not go mushy. These are removed along the length of the fillet, each being thin enough to see the blade of the knife through.

trout fillet 2

trout fillet 3

Ingredients

500g fish fillets – brown trout in this case

juice of 3 limes

juice of 2 lemons

juice of 1 orange

1 red chilli, deseeded and chopped

1 clove of garlic, peeled and crushed

1 tsp caster sugar

1 red onion, peeled and sliced

2 celery stalks, finely sliced

salt and pepper

Method

  • Slice the trout or your chosen fish as described – if you proposed to leave the fish in the acidic mixture for longer than a few hours, make the fish slices a bit thicker than I have.
  • Pour over the citrus, add the chopped vegetables, sugar and season with salt and pepper.
  • Mix carefully and leave in the fridge for about an hour, it will go paler as a result of its acidic immersion.
  • Serve with crusty bread – I chose broa bread and enjoy with a refreshing glass of white wine.

ceviche

Addendum – Parasites and fish

Thanks to Ken at The Garum Factory, I was reminded that I forgot to include a fundamental point in my blog, so much so I thought it should add a bit more info to highlight it. That is wild fish, fresh or salt water can contain parasites that have infectious stages capable of infecting humans, because we are mammals, we are potential hosts for some parasites.

Fish lightly ‘pickled’ in citrus juice, such as ceviche is essentially raw and therefore there is an elevated risk that you may eat a fish containing infective stages of parasites.

Parasites – a life less ordinary

The evolution and ecology of parasitism is a subject I would discuss ad nauseam. As a zoologist, I have always been fascinated by the behavioural ecology, life histories, pathological and immunological effects of parasitism. They are very specialised organisms capable of controlling the behaviour of their hosts to ensure their lifecycle is completed e.g. by releasing chemicals that alter the behaviour of an animal to make it more vulnerable to predation – there are many examples out there in the literature.

Parasitology formed a big component of my academic education.  My PhD focussed on parasitoids – not quite the same as parasitism but with the same evolutionary origins.  Parasitoids differ from parasites because they always kill their host to complete their lifecycle whereas a parasite needs to keep its host alive to complete its lifecycle.  Many insects are parasitoids, this being a relatively common insect life history.  To offer an analogy, the ‘Alien’ films illustrate the life history of a typical parasitoid. The alien is a parasitoid and needs to kill her host to successfully produce offspring. She lays her egg in a human host which is somewhat gruesomely killed as the nascent alien emerges  I digress.  Back to parasites of fish.

Looking for evidence of parasites

Parasites occur naturally in wild fish populations and as an angler, I have gained a bit of local knowledge and experience about which lochs contain fish with parasites, or heavier parasite loads.  I am also familiar with what the main species infecting our fish look like at different life stages within the fish and this helps me make a judgement call about whether I can use the fish for ceviche, cook it, or not use it at all.

It is important to examine the fish externally, gut and clean the fish as soon as possible to reduce migration of parasite larvae into the muscle (although sometimes they will already be there anyway). Also, I slice the fillets very finely.  Providing my examination has given the fish the all clear to the filleting stage, the translucent fillets are easy to see through to check for larvae, a bit like the practice in commercial fish preparation where fish are examined over candling tables, the light shining through fillet to reveal and allow removal of parasites from the flesh.

I would not eat a raw thick fillet, just in case. I would not use fish for ceviche  if I found parasites in the muscle or gut and I would not eat fish with parasite cysts in the flesh at all – even cooked.  Sometimes evidence of parasites can be seen on the outside of the fish and there is the option to return it.

Trout and parasites

The brown trout (Salmo trutta) includes both purely freshwater populations and the diadromous (moving between fresh and salt water) form, sea trout.  Sea trout migrate, spending most time in the sea only returning to freshwater to spawn (so technically they are anadromous).

Parasitic worms known generically as helminths to zoologists, fall into 2 broad categories: roundworms (nematodes) and tapeworms (cestodes). Both are found in brown trout.  Roundworms such as Anisakis simplex are marine in origin, the definitive host (host in which they reproduce) being mammalian – dolphins or whales.  Sea trout can be infected with these worms, but not freshwater brown trout as caught in Loch Hosta. This is an entirely freshwater population of trout. The one most common parasites for freshwater populations is the tapeworm Diphyllobothrium latum.

The fascinating lifecycle of a common parasite

Adult tapeworms of Diphyllobothrium latum can reach remarkable lengths – up to 12m and are found in mammal hosts.  So where does the trout come in?  Well, brace yourself.  Like the lifecycle of many parasites, it involves multiple hosts and life stages and is extraordinarily complex. I have simplified it a bit so you might still be awake at the end of the explanation!

The definitive host – mammal

Adult tapeworms live in a range of definitive mammal hosts, including humans. They are long flattened pale worms composed of nothing more than the scolex (head), neck and the lower body. Each side of the scolex has a slit-like groove, which is a bothrium (tentacle) for attachment to the intestine. They have no mouth and feed by absorption.

They are hermaphrodites that self fertilise (which makes evolutionary sense) and many millions of eggs are continually produced and released in segments called proglottids and leave via the digestive tract.  They can survive for up to 3 years once outside the body.

The first intermediate host – copepod

Hosts e.g. otters here excrete the eggs which make their way into freshwater bodies and streams.  This is where the next host comes in – a small aquatic crustacean called a copepod eats the eggs and the tapeworm larvae hatches within the copepod.  Here it lives for a few weeks, changing form again to an infective procercoid phase.

The second intermediate host – trout

The infected copepods are eaten by trout. When inside the trout, the proceroid migrates to the flesh of the fish and further develops into another form called the plerocercoid. This is the infective stage for us mammals and of most interest to the angler. It is a cream coloured worm, those I have seen are in the region of a few mm wide by 2-3 cm long. If the fish is caught and this infective stage is in the flesh and its presence goes unnoticed and the fish is eaten raw, the parasite has successfully completed its lifecycle and it is back in the definitive host – possibly me!.

Ceviche – don’t try this at home?

In the end you have to weight up the risk against experience, but you are not confident about what you are looking for, if in doubt, cook or freeze your trout.

Biscuits for Bartok 4 – Aniseed and lemon spelt biscuits

At last, we are back on Uist.  After almost a month away, I am pleased.  Sunny as it is, like the rest of the UK at the moment (but minus the snow) it is bitter with a brisk 35 mph easterly cutting across the islands today.  Not much has changed since we left, particularly given the prolonged cold snap – all the plants in the garden have pretty much stayed static due to the nippy weather.

It was an incredibly busy month for us and in between travels from here to London, up to Angus, Glasgow, Manchester, Cardiff and back home, we covered thousands of miles.  It was great to be able to catch up with more friends than usual, some which we hadn’t seen for a while, but encounters felt all too brief as we tried to cram everything we planned in.

I have opted to break myself in to cooking from scratch gently, trying a new biscuit for the musicians, by virtue of a miracle, produced in time for their arrival this week.  Skip to the aniseed and lemon spelt biscuit recipe at the bottom of this post if the minutiae of island life is not your thing.

Autogeddon Blues

‘My car is a polluter and it’s messing up my future…there ain’t no gettin’ round gettin’ round.’

Julian Cope, Autogeddon: ‘There ain’t no gettin’ round gettin’ round’

We also had to find time to change our car while we were away.  We have decided after much procrastination to get rid of our gas guzzling 4×4 and get a newer, greener and more economical car.  It was a tough call as we have always used the 4×4 capacity as a crutch to do as we please without much limitation: off-road, towing, driving in bad weather, however, we are not that interested in cars beyond functionality and reliability.

The reality is we don’t treat cars well: two big dogs and a lot of mud = mess, our car was an ill-treated workhorse. The salt spray and damp here is very damaging and corrosive and in light of that and from the point of view of common sense, we could not justify a price tag of £25,000 for a new 4×4 (real ones cost this much).

There is also the issue of running costs.  Fuel prices here are alarming, diesel being around £1.55 per litre, tax for a big 4×4 about £300 p.a., so it seems like a no brainer, despite our initial delusion that we needed and must have another 4×4. So, we will experiment for the next couple of years with our greener non 4×4 machine, and will be very glad to save £280 on tax p.a. and +35% on fuel per month as a result. Given it is shiny and new, we might even clean it now and then!

Muirburn mishap

Having said nothing much had changed, while we were away, we learned that an out of control moorland fire had damaged a significant part of the area where we take our daily dog walk.  We were pretty dismayed to hear this and a bit apprehensive about what we might find on our return.

The area in question is less than a mile from our house and forms part of the common grazings.  In 2000, a deer fence was erected around 100s of hectares on the grazing to exclude stock and deer and a tree planting project took place, forming part of a network planted on the year of the millennium in celebration of the occasion.  This so-called Millennium Forest has been struggling to cope with the Uist weather for the last 12 years.  Pockets of trees, particularly on the lee side of hills out of the prevailing wind have triumphed against adversity, some of them reaching small thickets of 2m, no mean feat in these conditions.

Moor 1

The thicket of alder above is exceptionally sheltered, the dogs often flush woodcock from the area in winter and an otter regularly spraints along the heather-covered narrow rivulet that runs between the two lochs (in the centre of the picture).  I’m relieved this part wasn’t damaged.

Some of the plantings across the moorland failed spectacularly, mostly due to the topography and severe exposure of the site.  Native species planted include birch, hazel, alder, willow, rowan and Scots pine. Alder seems to have been particularly successful, especially on slopes and in small valleys, coping well with the water-logging typical of this blanket bog habitat.

Hectro and Darwin confused by the moonscape - Where have all the grouse gone?

Hector and Darwin confused by the moonscape – Where have all the grouse gone?

moor 3Muirburning  is supposed to be controlled burning for land improvement, as opposed to the picture of devastation we found at the ‘forest’.  Of course, it doesn’t take long for the rumour mill on a small island to start about who may have been responsible and how and why this mess occurred.  As have said before, it is a small community and I prefer to avoid controversy in this blog.  It would be easy to be judgemental and lay blame, however, I don’t know the facts and it may be that this was an unfortunate accident in a well-managed muirburn episode.

That said, by all accounts it was very windy on the day of the fire hence in these circumstances, burning was possibly not carried out in line with the good practice guidance within the Muirburn Code. The fire brigade and beaters were out all night bringing it under control as it got uncomfortably close to the houses in the township.

In these circumstances, several offences may have been committed.  This is not least because the burning destroyed the woodland, it also extended across areas of golden eagle, hen harrier and short-eared owl territory and habitat and I fear for the nest of the local golden eagles, one of which I photographed in a previous post.

The edge of the burnt moorland, showing the contrast before and after

The edge of the burnt moorland, showing the contrast before and after

A significant amount of deep heather habitat has been lost from an area where I have known hen harriers to nest for the last few years and I will miss the delight of seeing them fledge chicks as I have done for the last 3 years from this one particular area.  Fortunately there is enough suitable habitat nearby for them to relocate.

I took a few photographs as a record and will continue to do so as the heather regenerates.  Most of the trees across the burned areas are too badly damaged to regrow, or entirely annihilated. The acrid smell of burning vegetation still hangs heavy in the air.

An old deer track revealed by the burning

An old deer track revealed by the burning

Perhaps one of the most striking reveals is the scarring left by the mechanical tree planting carried out back in 2000.   I didn’t live here at the time, but by all descriptions, a vehicle removed uniform chunks of peat at intervals across the bog and turned them over on top of the surface to provide a soil mound for trees to be planted on.  I knew the impacts were there as it is almost impossible to walk across the ground due to the gouged out mounds. The scarring is quite horrendous and the damage will remain for many decades, long after the effects of the muirburn incident have disappeared as the heather regrows.

Mechanical planting holes created for tree planting

Mechanical planting holes created for tree planting

The 1000 mile challenge

Being away means I have been completely out of my running routine.  Both of us also managed to catch a pretty horrendous cold, quickly followed by conjunctivitis, upon getting back to Scotland from London – a new and unsavoury experience for us both! Needless to say, it has taken some time to recover (and see properly again!), so I have only just felt up to running again for the first time in 3 weeks, and managed a 4 mile run today. 

That said, in my wisdom, I decided to join one of my Facebook friends who has organised a group to chart progress over the year for a 1000 mile challenge – hence I have committed to running 1000 miles this year.  This would be fine had I not had a 3 week lag in March.  I better order a new pair of running shoes – I’m going to need them, sitting around 170 miles for year to date. 

Aniseed and lemon spelt biscuits

Week 4 of my biscuit-making explorations and I have decided to ditch recipes and freestyle from now on.  This biscuit is based on the flavours of pastis with a twist of lemon.  Don’t be deceived by the bland image of the biscuit – it is a wolf in sheep’s clothing and packs a vibrant flavour punch.  However, the punch is an aniseed one, so if this flavour is not your bag, try more subtle caraway, fennel for similar notes, or reduce the volume of seeds added. 

The biscuits are not that sweet and are very crunchy.  Good dunked in coffee, apparently, so I’m told, I’m not a dunker. Makes about 18 biscuits.

Pre-heat the oven to 180C (fan)

Ingredients

60g unsalted butter

40g caster sugar

40g soft brown sugar

1/2 tsp vanilla essence

80g plain flour

60g spelt flour

1 tsp baking powder

1/4 tsp salt

1 tsp aniseed seeds

grated zest of one lemon

Method

  • Cream the butter and sugars together in a stand mixer.
  • Add the rest of the ingredients and combine to form a soft dough.
  • Allow to rest in the fridge, wrapped in clingfilm for at least a couple of hours.
  • Roll the balls of dough to the size of a cherry and place on a greased baking sheet, press the balls down gently to flatten, spacing them a few cm apart.
  • Bake for 15 minutes, check at 10, they may be ready depending on your oven – they should be pale golden around the outside.
  • Place on a wire rack to cool.  Get the coffee machine on.

aniseed biscuits

Venison Volume I: In the Flesh, my deer

Warning:  This post contains content about the reality of eating animals (again) and describes butchery and contains images of same.

I am pleased to say that at last, the deer hind we took delivery of last week is finally completely prepped and in the freezers. I am even more delighted that we managed to use almost every piece of the animal, just as it should be, with only one small carrier bag of no more than a couple of kilos of waste.

We are no butchery experts, but are self-taught. We butchered our first whole deer carcass 3 years ago with the help of a couple of useful books, web searches and You Tube. It’s surprising how much we remember, given we only do this once a year and this year we were patting each other on the back for not reaching for any references. That doesn’t mean it’s perfect, but the animal is prepared with care and respect to provide the cuts that we want. I hope this post will help or encourage others to try the same.

For me, venison is the finest of all red meat, and red deer the finest of all Cervidae. Better still, it is wild meat hence has much fewer welfare issues that are associated with domesticated stock such as cattle and sheep. Although, it is true that good wild deer welfare is dependent on good deer management practices. Wild deer populations require careful management for the benefit of the landscape and importantly, the fitness of the animals themselves.

There are a lot of deer on North Uist and culls at an appropriate level can take the  pressure off a fragile landscape, not to mention crofters crops and gardens like mine (we have just this minute scared some red deer our of our garden). The deer population also benefits from this management.  Maintaining the population at the correct level i.e. below the carrying capacity for any given habitat improves fitness by reducing the risk of starvation in lean times and helps the animals maintain good condition over the winter, improving reproductive success.

Food provenance is also not particularly a consideration with our Uist deer. When you pick up your animal from the local abattoir on the island on which is was shot a few days before, there are no ambiguities about its provenance.  It is also a lean red meat, is relatively healthy and extremely versatile. It is also reasonably rich and dense, so a little goes a long way. So, I see benefits all round.  This is meat that is good for your conscience as much as your health and palate.

I am always rather disappointed by beef these days.  To my palate, even the leanest cuts taste fatty compared with venison (because they are).  Some would argue fat brings flavour but a well hung piece of venison cooked to perfection will beat beef hands down – provided you understand how to cook it. Less is more. If you cook it to the Jesus sandal stage of leathery cremation, it is truly abhorrent.

Did I mention that I like venison?

If you want to avoid or have no interest in the following butchery section please see the recipe for Blackened venison chops with pak choi

Managing your own deer

The hind weighed 86 lb when we took delivery of it.  This is the dressed weight meaning it is skinned and with the head, feet and internal organs removed, about 55% of the live weight.  It is ready to butcher.  It had been shot 2 days before.  Ideally, we like the venison to hang for about a week to age and enhance the depth of flavour. We hung it up in our shipping container for a few more days. You should only do this if the temperature is low enough and you can guarantee the environment is fly free, otherwise, get on with butchery.

Suggestion: Before you start select some appropriate music.  You are going to need motivation for the duration.  Since it was a team effort for us, we came to a consensus that perhaps Bach or Sibelius would not serve us with the motivation required.  We selected the Planet Rock radio station.  A plethora of rock classics got us through to the forequarter.  Memorable chestnuts we had not heard for a long time spurred us on: Speed King by Deep Purple (The Hairy Scream at his best), early ZZ Top – La Grange and some distinctively cheesy 90’s power rock – Thunder’s ‘Love Walked In’.

Hind halves hanging to age the venison and enhance the flavour

Playlist in place, first thing to do before you even start is make sure you are equipped with VERY sharp knives, appropriate for the job.  A boning and a paring knife are essential, as is a butchers saw (or hacksaw). Fortunately, The Man Named Sous is an expert at sharpening knives.  Just as well because our knives, Chroma 301, made of Japanese steel, require to be sharpened on a wet stone.  It is tricky to get the sharpening angle correct and depends whether you are right or left-handed.  Fortunately we are both right handed. The room should be cool as the meat is easier to work with in cool conditions.  Finally, make sure surfaces and clean, disinfected with something like dilute Milton fluid. Once you get your deer ready to butcher, have a look over it, remove any hairs sticking to the carcass.  Look and see where it has been shot and the implications for how you butcher it.  This hind had a body shot which damaged part of the loin on one side, so we needed to take that into account.  In the past, we have had deer shot through the shoulder.

This results in quite significant damage to the shoulder joint and a lot of meat can be lost as a result.

The Fillet

This is the first cut to be removed and it sits alongside the loin and continues back and into the pelvis.  This prime cut is very fragile, so you need to know where it is and what it looks like before you start, or you will invariably cut straight through the club-shaped end at the rear of the beast. Working from the anterior end, drop the fillet away from the body. It starts to taper thinly at the end just as you reach the clubbed end, which is embedded in another group of muscles associated with the pelvis.

Dropping the fillet, reaching the tricky point at the haunch.


Fillet removed, showing the double piece of muscle at the rump end.

Once you have worked out where the end sits, carefully remove it intact.  There is a thin muscle lying along the length of the fillet.  This can be trimmed off and I usually use it for stir fry.
The Loin
For this half, the loin was cut off using the saw just at the end of the ribs. The loin runs right along the top of the back from the shoulder to the rump.  We decided to cut here to remove the damaged section where the hind had been shot and also as we prep the loin in association with the ribs at the front.

Loin just before boning out showing the location of this prime cut

Boning out the loin is straightforward.  Care must be taken to remove all sinew and connective tissue around it to prevent distortion during cooking.  This applies to all cuts intended for quick cooking.  It can be time-consuming, but there is nothing worse than a nice medallion that is misshapen and chewy round the edge because sinew has been left on it.

Loin removed from the bone, still with fat and sinew attached

All fat and sinews removed, the loin can be sliced to form medallions (also called loin/sirloin steaks). In this case, we left it intact as we are planning to use it in a Venison Wellington.  Together with the fillet, loin is the best cut.

The loin fully prepared and ready to be used in a Venison Wellington.

To bring out the best in the loin, it should not be cooked more than medium rare. It contains very little fat and overcooking will dry it out. I prefer it either very rare (almost bleu) or rare. Undercooking, searing the outside to get a caramelised exterior and resting are the best treatment to guarantee succulence and a soft, almost melt-in-the-mouth texture. Resting is also very important to relax the meat and draws the juices back to the more cooked meat around the outside.   You know your medallion is well rested when all juices remain within the meat when it is served.

The Haunch

The back leg and rump. It is a big piece of meat.  In the past, we have kept the muscles together and boned out the joint but it weighed kilos and we simply didn’t want to hold a banquet to use it.  We now take the 4 muscle groups (rump, topside, silverside and thick flank) apart and cut them into sensible sized pieces.

The main haunch muscle groups minus the rump. Clockwise from the top: Hand is on the silverside, below is a small muscle, the salmon cut, topside at the bottom and the rounded thick flank on the left.

Silverside and salmon cut are good for steaks and roasts. Again, all sinew including the silver connective tissue that gives the cut its name should be removed.

Removing the silverside and salmon cut from the other muscles

Silverside and salmon cut. Silverside showing the silver tissue that identifies it. This was removed and it was cut into steaks. The salmon cut was left whole.

The thick flank is a rounded muscle group made up of 5 muscles.  It usually makes a good rolled roast, but if from an older animal, may be best as stew. The topside is great for steaks, the largest from the animal. It is also good for making bresaola, which I have done in the past. Although traditionally an Italian recipe for beef, it works well for venison. It is salt-cured with herbs and spices then air-dried for at least a month during which time it goes deep red, almost purple. Sliced thinly, it makes wonderfully distinctive antipasti.  I would recommend giving it a go.

Fully prepared thick flank (left) and topside (right).

Below these cuts is the shank, a piece of meat that requires very slow cooking, either on the bone, or sliced and including the marrowbone, called ossobuco, an ingredient  in many classic recipes.

Musical interlude

By this point, the process was getting pretty intense and we needed another musical boost.  Planet rock was wearing thin with an increasing amount of ‘Cradle Rock’ such as Foo Fighters (stick to Them Crooked Vultures,  Grohl) and the final nail in the coffin was Bon Jovi’s ‘Bad Medicine’ an appalling track.  Bad Medicine, no Jon, just bad songwriting. This is not rock! Hang the DJ, as the great Mozza said…

Time for our own musical back catalogue and a motivational smack between the eyes – Lamb of God’s Sacrament  followed by Machine Head’s The Blackening.  Whoaaah!! Having then had enough Mofos for one day, time for something epic and loud, that’s right, it’s Epicloud, Devin Townsend’s captivating new album. The only Canadian more prolific and consistently brilliant as Neil Young. However, typical of Hevy Devy, this album is so complex I was unable to concentrate on both the butchery and the music. Time to try Porcupine Tree’s The Incident…..

The Forequarter

The front end of the hind including the neck, shoulder, ribs/loin and flank. We prefer to bone out the shoulder and dice it to use as stew.  Parts of it are also used for mince and sausages, as is the flank.  Boning out the shoulder is time-consuming, but there is a lot of meat and it is worth removing as much sinew as possible, even if though it will be used in stew/sausages. The shoulder can also be rolled.

Removing the shoulder in preparation for boning out.

The bottom of the ribs were retained for stock. We kept the tops attached to the loin and sliced these into chops. Immense on the barbeque (on the few days a year we can have one here).

Venison chops

The neck contains good meat for stew and the bone is excellent for stock making.  All bones from this hind were retained to make stock (recipe to be featured in Venison Volume II).

So, give it a try!

Although, as will have been deduced from this butchery description, it is a protracted process but it is worth remembering how satisfying it is to butcher your own deer to produce the cuts you want.  Also worth giving it a go, even if you are a beginner.  We were too.  Mistakes will happen, but it’s not the end of the world. Stick to separating muscle groups and you can’t go far wrong.  Think about where the meat sits on the deer, how these muscles will have been used and how this affects how you will use them. It is a steep learning curve the first time but ultimately rewarding to know you have treated the deer with respect and you will be proud to honour it in your recipes over the months to follow.

After all that butchery, a simple dinner is required.  For the simplest possible dish, why not try venison chops?  I found this recipe in Nichola Fletcher’s book ‘Ultimate Venison Cookery’, a mandatory purchase and reference for the venison lover. It is derived from the recipe ‘Blackened rack of venison with a gratin of fennel’.  I just use the marinade and mix and match with whatever fresh veg I have to hand from the garden. In this case, it was my super-abundant and bolting pak choi crop at the end of August.

Blackened venison chops

Ingredients:

1 tblsp balsamic vinegar

2 tblsp soy sauce (I used dark)

2 tblsp clear honey (also have made with cloudy, doesn’t make much difference)

Method:

That’s it! Mix, rub into the chops  (or steaks, whatever quick cook cut you choose) with a bit of pepper. Marinade for a few hours, grill or stick on the barbie.

Stir fried pak choi with chilli and spring onions

Served with the chops last time I made them.  Very simple and tasty.

Ingredients:

A few handfuls of pak choi

sesame oil, a small glug

a handful of spring onions

1 fresh red or green chilli

sesame seeds

Method;

Heat a small amount of sesame oil in a wok, on a high heat.  Add the chilli and stir fry for a couple of minutes.  Fling in the sesame seeds and stir until golden and popping, about 1 minute.  Throw in the pak choi and stir fry until the leaves wilt down a little.  Add the spring onions, turn them through the pak choi and then serve.

Blackened venison chops with pak choi